|
Server E-Mail Settings |

|

|
|
|
Server E-Mail Settings |

|

|
Server E-Mail Settings
Pro and higher levels of Captools/net offer you the option to e-mail PDF format reports at the time that they are generated.
Configure Captools/net Email Settings
Before you can take advantage of this capability, you must first activate your Captools/net email functions via the Captools/net Server Control Panel:
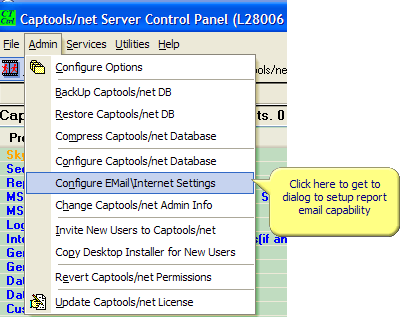
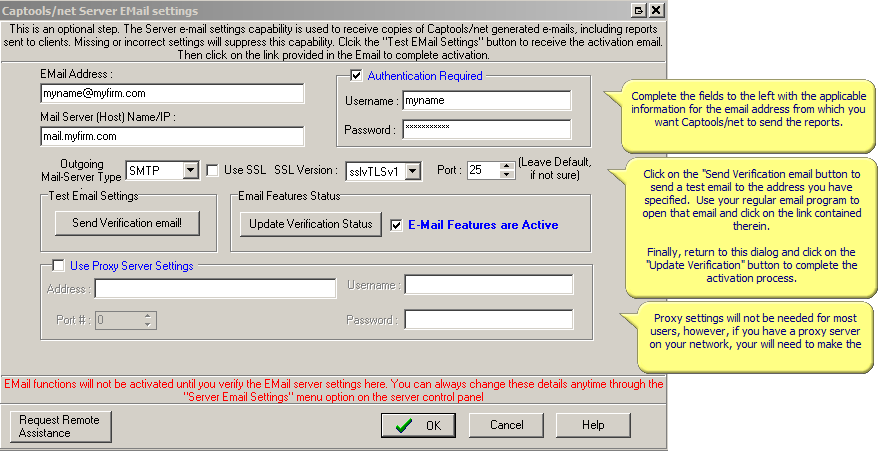
After entering the relevant information, click on "Send Verification email" button. Then go to your email and find and open the verification email and click on the link therein. Then come back to this dialog and click on the "Update Verification Status" button.
Online Email Services Activation
To successfully activate your email capability if you are using an on-line email service, you will generally need to get the "SMTP" protocol parameters for that service.
Google Gmail Services SMTP Server
Mail Server: smtp.gmail.com
User Name: this will be your full gmail email address, e.g. my.name@mydomain.com
Password: Use the password assigned to your account (see "Gmail app password" below to create password for Captools)
Outgoing Mail Server Type: SMTP
Use SSL Connection: Checked (on)
SSL Version: sslvTLSv1
Server Port: 587 or 465
Gmail App Password
Log into your Gmail account to create an "App Password" for Captools, e.g.:
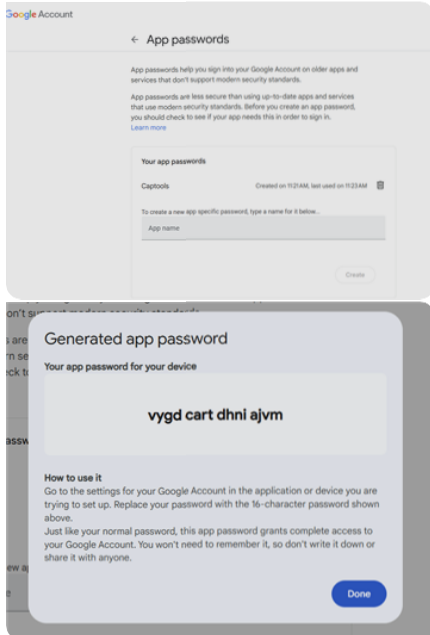
Gmail will create a unique password (not the example above) which you will enter into the Captools email setup dialog, then send the verification email.
Note: If you change your Gmail password you will also have to re-generate your password for Captools, and repeat the email verification process.
Important for Gmail: You may also need to configure your Gmail account to "allow access by less secure apps" as per the instructions at:
https://support.google.com/accounts/answer/6010255
i.e.:
1. Open your browser and login to gmail
2. Click the button in the top right with the nine little squares and then click "My Account"
3. Click "Connected apps and sites"
4. Scroll down and change the setting for "Allow less secure apps" to "On".
5. If you have specified 2-factor authentication for your email account, please see Google help at "https://support.google.com/accounts/answer/185833?p=InvalidSecondFactor". This will explain how to get a special password from Google to assign to your Captools/net app. (https://myaccount.google.com/apppasswords).
Microsoft Online Services SMTP Server:
Mail Server: Smtp.mail.microsoftonline.com (N. America) (see below if you use Microsoft's "Office 365" for email).
User Name: this will be your full email address, e.g. my.name@mydomain.com
Password: Use the password assigned to your account
Outgoing Mail Server Type: SMTP
Use SSL Connection: Checked (on)
SSL Version: sslvTLSv1
Server Port: 587
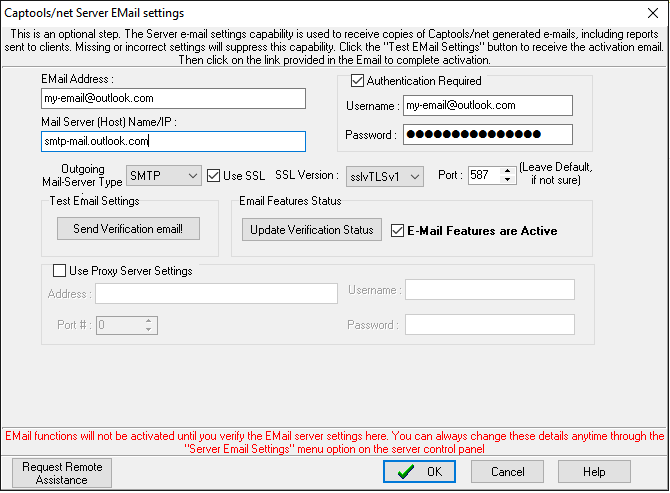
An example setup with Microsoft's Outlook.com mail-server similar to what you could use with you "Window Live" account would be as follows:
Microsoft Office 365 Email Service (i.e. you get your email through Office 365)
Mail Server: smtp.office365.com (N. America)
User Name: this will be your full email address, e.g. my.name@mydomain.com
Password: Use the password assigned to your account
Outgoing Mail Server Type: SMTP
Use SSL Connection: Checked (on)
SSL Version: sslvTLSv1
Server Port: 587
Third party Email host Limits - Some third party emails hosts will limit the rate that emails can be sent by a user, presumably to prevent their service from being used by spammers. If you are using such a host to send Captools/net reports, you could find that some report emails are dropped if they are sent at too fast a rate. You can control the maximum rate that report emails are sent via the "Reports" tab of the Captools/net Server Control Panel "Configuration" dialog as indicated at Server Control Panel Report Options.
Specify Email Reports in Account Records
Specify one of the two available client e-mail addresses and fax numbers as the report address destination on the report tab of the Client/Account records edit view:
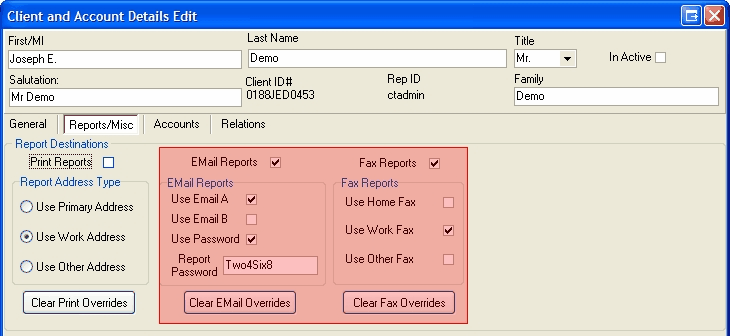
When reports are run, whether they are triggered manually (as described in Running Existing Reports) or are run scheduled reports (as described in Scheduled & Saved Reports), the E-mail option above will need to be checked before the report will be sent electronically to the client. (Note: faxing of reports has been deprecated due to newer computers lacking fax ports).
E-Mail Overrides - The settings shown in this example apply to the client, and all of his accounts, provided they have not been "Overridden" at the account level. Account level e-mail and fax settings are available on the Account tab, and Reports sub-tab as show in the Overrides in the Client/Account Details Edit example below. If Overrides are set, the applicable "Clear .. Overrides" button will be enabled. Clicking on the button allows you to clear the account level override without needing to tab to the Accounts/Reports edit tab.
E-mail Password - It is generally good practice to specify that e-mail reports be password protected. Selecting this option results in encryption of the PDF file which is attached to the e-mail which transmits the report such that a password is required to open the report. It does not encrypt the e-mail itself. You should choose a non-obvious encryption password that does not relate to anything that would appear in the e-mail header (to or from address or subject). If you want to use the same password for all clients for the sake of simplicity, you may add the password field to the client record view and use the Data/Fill Down function to fill all records.
The above settings are at the client level. However, you can optionally override these settings at the account level by selecting the applicable account on the "Accounts" tab, and then specifying the override settings on the "Reports" sub-tab:
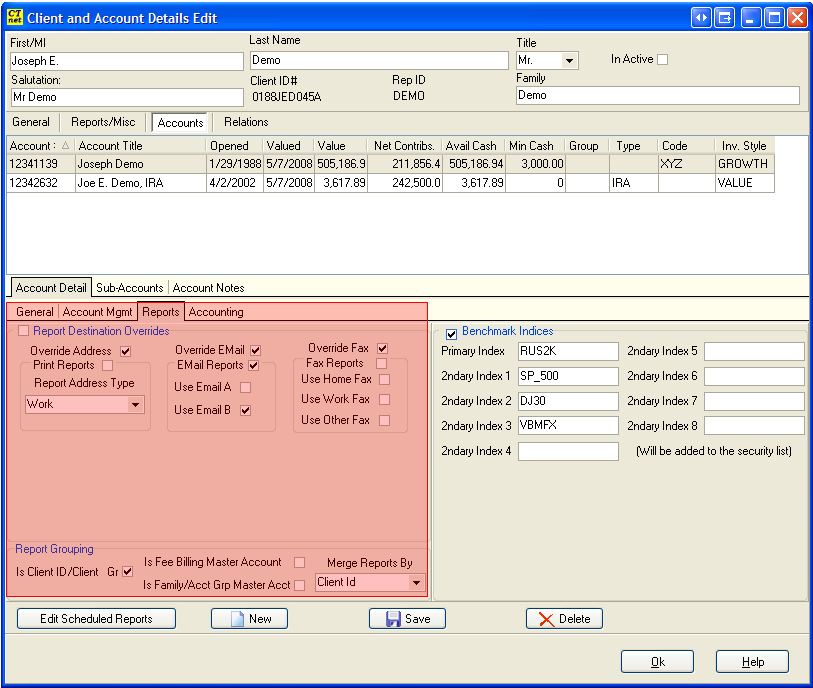
This is useful for situations in which a client may want to have different delivery options for reports from from different accounts. For example, he or she may want reports for one of their accounts delivered to their work address, or if e-mailed or faxed, e-mailed or faxed to a different e-mail address or fax number. Account level overrides permit you to specify these options.
Specify Emailing Report at Report Runtime
At the time the report is manually run, you must specify that you want to have the report emailed. This is done on the report run setup screen as follows:

Warning!: Since reports will be sent at the time you run the reports you should not active this checkbox unless you intend to email reports immediately. If you want to review the reports first, you should save the reports first (click on save settings button above), then review the reports by opening the saved reports, and finally, rerun the reports with the "E-mail" option above checked. We caution however, that between when you generate the saved reports and email the final report that you do not add or modify Captools/net data or install program updates to ensure consistent results. (Note: future versions will offer the ability to send saved reports, eliminating this concern).
Enabling E-mail Reporting for Scheduled Reports - For e-mail or fax reports to be generated for scheduled reports, you must specifically enable their generation in the Scheduled Report setup by checking the Send Report to Client option.
When the report is emailed, the contents of subject and the body of the email are specified via the "Client Email Specifications" which optionally appear for both the Run Report specifications and Report Sets setup controls. Clicking on the "Show Email Options" reveal these specifications, appearing as follows:

The text contents of the email message accompanying the email can be edited directly in the above controls, with placeholders available as follows. These placeholders can also be used the construction of file paths and names in Saved Reports:
%ClientName% - Name of the client as appears in the client record. If multiple clients are in the report this would be the client associated with the master account in the report.
%RepName% - Name of the representative assigned to the client.
%RepID% - Rep. Id of the representative.
%Date% - Current date
%ADT_TaxIdentifier% - Client identifier assigned to the client.
%CDT_LastName% - Client's last name.
%CDT_FirstNameMI% - Client's first name
%CDT_Salutation% - Client's salutation as appears in the client record.
%CDT_Family% - Family identifier assigned to the client.
%CDT_ClientGroup% - Client group assigned to the client.
%ADT_AccountGroup% - Account group to which the report's master account belongs.
%ADT_ClientAccountNumber% - Account number of the report's master account.
%ADT_AccountTitle% - Title of relevant account.
%TaxIdentifierCount% - Number representing # of clients covered in attached reports.
%ClientAccountNumberCount% - Number representing # of accounts covered by attached reports.
%ClientAccountGroupList% – List of Account Groups included in the current group per merge criteria.
%ClientAccountNumberList% - List of Account Numbers included in the current group per merge criteria.
%ClientAccountTitleList% - List of Account Titles included in the current group per merge criteria.
%YMDDate% - Year-Month-Day
%LONGMONTH% - Month, full name
%YYYY-QQ% - Year and quarter of the report based upon report run date.
%YYYY-MM% - Year and month of the report based upon report run date
%CDT_UserDef1% to %CDT_UserDef9% - for items held in the "User Def" fields in the client records (these fields available in higher levels of software)
%ADT_UserDefined1% to %ADT_UserDefined5% - for items held in the "User Def" fields in the account records (these fields available in higher levels of software)
External Attachments
The following placeholders implement the ability to add external files to email as an attachment:
%ATTACHMENTLIST% - List of report files attached to email.
%ATTACHMENT% – External file name to be attached to the report email. Usage is %ATTACHMENT%=%NewsLetter.pdf% where NewsLetter.pdf is the file to be attached stored in the same location as logo files i.e. in the Custom Reports base folder.